You have been staring at that corner of the living room for months. Your cat has been staring at you. The store-bought cat tree you considered three times and talked yourself out of costs more than you want to spend, looks nothing like the rest of your home, and has online reviews suggesting it starts wobbling within six months of purchase. Meanwhile, your cat is scaling the bookshelf again, systematically testing whether every item on every shelf can survive contact with a determined tabby moving at speed.
Here is the truth that thousands of cat owners have discovered and immediately wondered why nobody told them sooner: building a cat tower at home is genuinely achievable, costs a fraction of what you would spend at the pet store, produces a result that actually fits your space and aesthetic, and makes your cat use it with an enthusiasm that store-bought towers rarely generate — because it smells like your home, it was built for your specific cat’s size and behavior, and you made it with your hands.
The twelve builds in this guide span every skill level from complete beginner to ambitious weekend woodworker. Every single one includes the full materials list, step-by-step instructions, difficulty rating, approximate cost, and the specific design insight that makes that build worth choosing over the others. Start at the beginning and find your level, or skip to the build that matches your cat’s personality and your home’s aesthetic. Either way, your cat’s corner problem is about to be solved.
Before You Build Anything — The Three Questions That Determine Which Tower Your Cat Will Actually Use
Building the wrong tower for your cat is the most common mistake in DIY cat furniture. You build something beautiful that your cat ignores, and you assume you did something wrong in the construction. Usually, the problem is not the build — it is the design choice that did not match your specific cat’s behavioral preferences.
Your cat’s instincts determine how tall your tower should be, what materials to use, and how many levels to build.
Question One: Does your cat prefer height or enclosure? A cat who constantly seeks the highest point in every room — the top of the refrigerator, the highest bookshelf, any elevated surface — needs a tower that prioritizes height and open perching platforms with sightlines across the room. A cat who hides under beds, in boxes, in closets, needs a tower with enclosed spaces — caves, tunnels, enclosed sleeping boxes — alongside or instead of open platforms.
Question Two: Does your cat scratch vertically or horizontally? Observe which surfaces your cat chooses naturally. A cat who scratches door frames and vertical surfaces needs tall vertical sisal posts. A cat who scratches rugs and flat surfaces needs a horizontal scratch surface at the base of any tower.
Question Three: How old and how athletic is your cat? If you have kittens or senior cats, keep the levels closer together so the jumps aren’t too big. A young, energetic cat needs a challenging height with platforms 18 inches apart. A senior cat needs wider, lower platforms with steps or ramps between them. Building for a ten-year-old arthritic cat the same way you build for a two-year-old Bengal produces a tower the senior cat cannot safely use and will avoid entirely.
Answer these three questions honestly before looking at any of the twelve builds below. The best build for you is not the most impressive one — it is the one that solves your specific cat’s specific needs in your specific space.
The Safety Rule That Every Builder Must Follow Without Exception
Aim for 12 inches by 12-inch platform minimum for comfortable lounging. Choose platform sizes that give your cat room to turn around and stretch — no narrow ledges that could cause a fall. Add a non-slip surface on every platform so they can land securely.
Every platform must be non-slip. Every post must have zero wobble. Keep any hanging toys short — long strings can wrap around a neck or leg during play. Sand every cut edge before assembly so no rough surfaces contact your cat’s paws or skin. These are not optional finishes — they are the non-negotiable safety foundation of any build on this list.
Build These 4 DIY Cat Furniture Pieces This Weekend →
Tower 1 — The Classic Three-Level Sisal Tower (Beginner, $30 to $50, One Weekend)
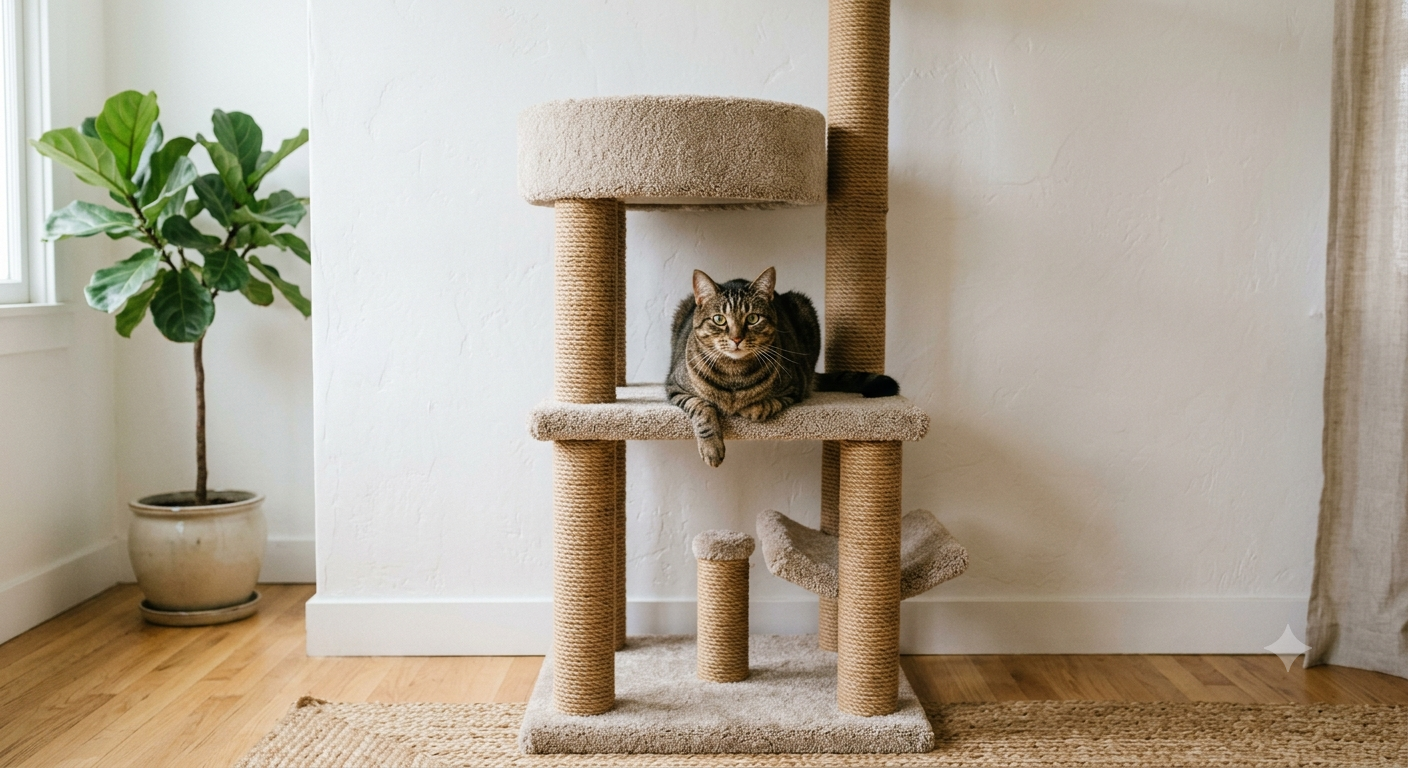
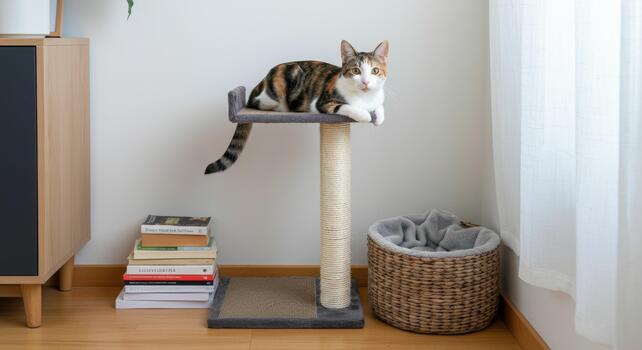
This is the build that belongs at the top of this list, not because it is the most impressive, but because it is the most reliably successful first DIY cat tower project. It uses materials that are widely available and inexpensive, requires only basic tools, and produces a result that genuinely outperforms its cost in every measure — stability, scratch surface quality, platform size, and cat adoption rate.
Materials
One sheet of three-quarter-inch plywood, from which you cut three platforms: one base platform of 24×24 inches, one mid platform of 18×18 inches, and one top platform of 14×14 inches. Two 4×4 wooden posts cut to your desired heights — one at 18 inches and one at 36 inches. Two 50-foot coils of 6mm natural sisal rope. Carpet remnant for platform surfaces. Wood screws and wood glue. Sandpaper in 120-grit. Hot glue gun. Stain or exterior paint if desired.
Build Steps
Cut all platforms to size and sand every edge thoroughly. Wrap posts with sisal rope to create a durable, claw-friendly surface. Use natural sisal rope that is gentle on paws and safe if they lick or chew it. Keep the wrap tight so claws do not slip into gaps or pull the rope loose. Make sure glued areas are fully dry before your cat tests their new scratching spot.
Begin wrapping the first post from the bottom, securing the rope end with a tek screw or staple driven into the back of the post. Apply hot glue every four to five wraps along the top edge of each completed row, pressing the next wrap firmly into the glue before it sets. Work upward continuously until the entire post is covered. Secure the rope end at the top with a staple and a final bead of hot glue, holding it for thirty seconds until it bonds.
Attach the base platform flat to the bottom of the tall post using screws driven through the plywood up into the base of the post. Carpet the base platform before attaching — cut carpet to size, fold, and staple under the edges. Attach the mid platform to the shorter post at its mid-height using an L-bracket on the underside. Attach the top platform to the top of the tall post. Connect the two posts by screwing the short post to the tall post at the base through a connecting bracket, or position them side by side with a shared platform connecting them at the mid level.
Attach a 90-degree angle bracket to the top shelf and use drywall anchors to secure the cat tree to the wall. This wall-anchoring step is not optional for any tower taller than 36 inches. A cat landing hard on the top platform of an unsecured tower can tip it, and a tipped cat tower is a potentially serious injury risk. Drive the wall anchor into a stud wherever possible.
Why cats love this build: The sisal wrap covers the entire post height from ground to platform, which is exactly the stretch length a cat needs for a complete scratching session. The platform graduated sizing creates a natural climbing sequence from the wide, stable base to the slightly smaller upper perches.
Tower 2 — The Natural Branch Tree (Intermediate, $40 to $70, One Weekend)
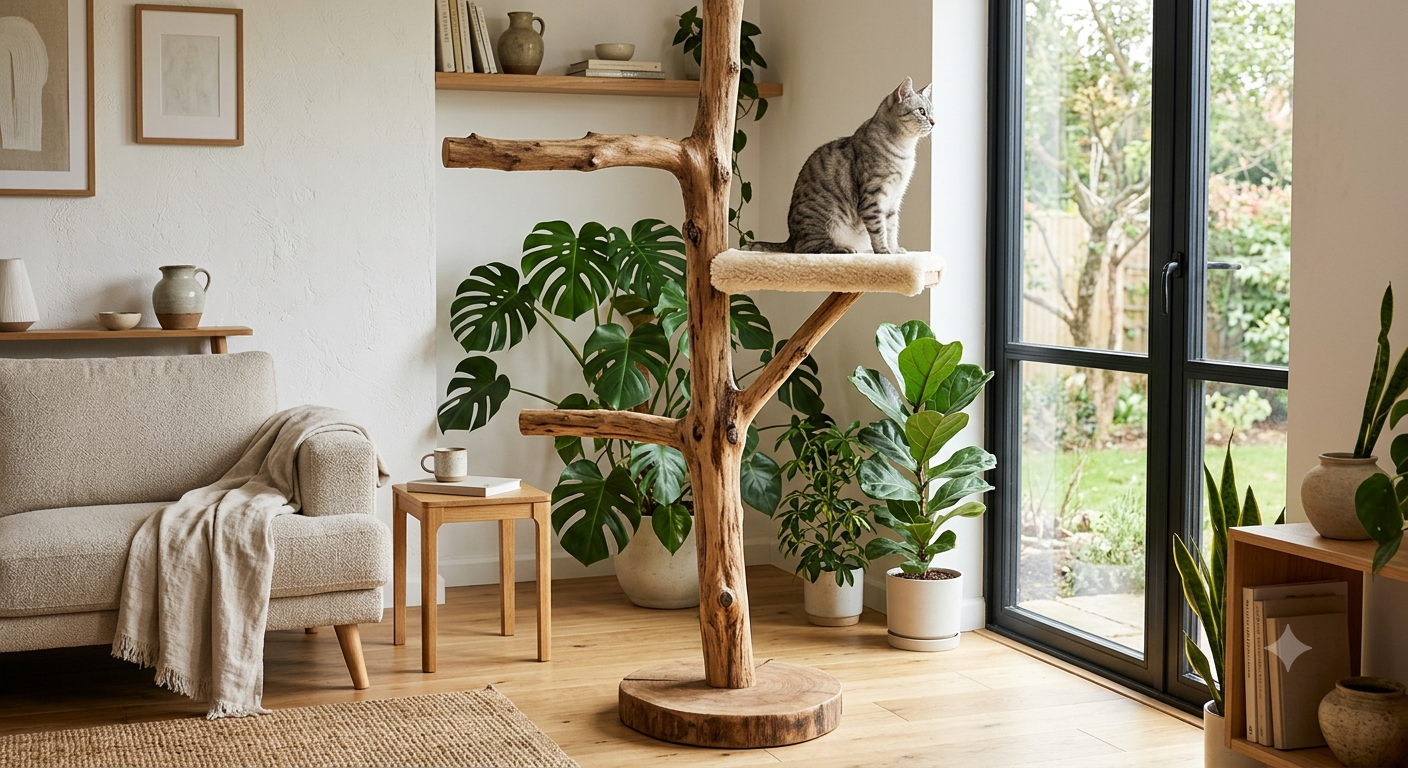
Start by finding downed trees you think are interesting. Ideally, they have not been lying on the ground, so there is no rot, and the wood is dry. Use a bark stripping tool and/or a chisel and hammer to remove the bark. Finish the wood with natural beeswax and orange paste or another non-toxic finish. This is the tower that looks like it was ordered from a boutique pet shop, costs $40 in materials, and makes every visitor ask where you bought it. The answer — you made it from a fallen tree branch — is one of the most satisfying things you will ever say.
Materials
One main branch of 3 to 4 inches in diameter and 4 to 6 feet in length — fully dried for at least two weeks indoors. Two to three smaller branch sections for horizontal perches. A 24×24 inch plywood base in three-quarter inch thickness. Lag bolts and screws. Non-toxic beeswax wood sealant. Fleece or carpet remnants for platform surfaces. A bucket or heavy planter base as an alternative stabilization method.
Build Steps
Allow the main branch to dry completely before starting — moisture in the wood causes shrinkage that can loosen all connections after assembly. Strip any remaining loose bark using a chisel and medium sandpaper. Apply one coat of non-toxic beeswax or water-based polyurethane to seal the surface, and allow it to cure fully.
Use 3-inch screws driven through the platform into the branch. With smaller branches, you may need shorter screws. Use a level, or it will not look as nice as hoped. Drill pilot holes through the base plywood at the branch placement location, slightly smaller than your lag bolt diameter. Drive the lag bolt up through the base into the bottom of the main branch — this connection is the most critical structural point of the entire build and must be tight with zero movement. If the branch base is irregularly shaped, use a flat chisel to create a level contact surface before mounting.
Attach smaller branch sections horizontally at chosen heights by drilling pilot holes through them at the attachment angle and driving screws through into the main trunk. These horizontal branches become the perching platforms — add a small plywood section across the top of each if the branch is too narrow or irregularly shaped for comfortable resting, carpet it, and screw it in place.
The most common failure point in natural branch builds is the base — a branch tower needs a base heavy enough to prevent tipping when a cat leaps onto the top perch. I started this build with maple branches, but most of our builds have been hickory from our Kentucky property. I try to have at least one substantial base of about 4 inches in diameter, typically the tallest. If the base feels insufficiently weighted, add a layer of thick plywood below the existing base or anchor it to the wall as described in Tower 1.
Why cats love this build: Natural wood carries scent compounds and textural qualities that immediately register as appropriate scratching and climbing material in feline instinct. The irregular surface of a real branch engages a cat’s balance systems more actively than a perfectly flat platform — every use is physically stimulating in a way that manufactured surfaces cannot replicate.
Tower 3 — The IKEA Hack Modular Tower (Beginner, $45 to $65, Afternoon)
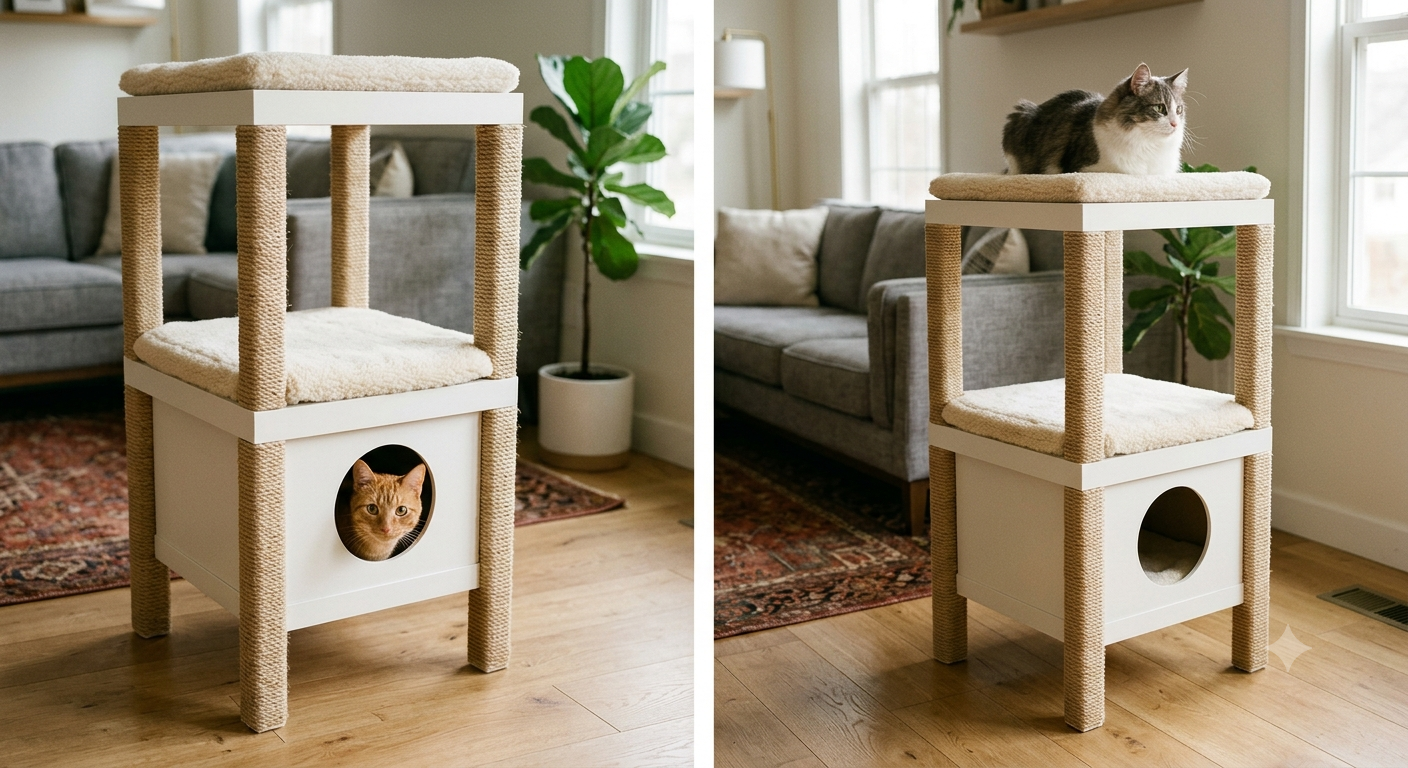
A lot of these DIY cat tree ideas use IKEA furniture as bases. The advantage is that IKEA pieces are very cheap to buy, and they give you a good framework to customize. No advanced woodworking skills or tools needed.
Stack three IKEA Lack side tables — available for approximately $12 each — secured together into a three-level tower with sisal-wrapped legs and carpet platforms. The result is a structurally solid, visually clean tower that can be completed by anyone with a screwdriver and an afternoon.
Materials
Three IKEA Lack side tables in the same color. Metal corner braces — four per connection point. Screws appropriate for the Lack table material. Three 50-foot coils of 6mm sisal rope. Hot glue gun. Carpet or fleece for platform surfaces. Optional: jigsaw for cutting an entry hole in the side panel of the lowest table for a cave effect.
Build Steps
Place the first table right-side-up. Turn the second table upside-down and place it centered on top of the first, matching the legs. Connect the two table bases face-to-face using metal corner braces on all four internal corners, driving screws through the braces into both table bases. The inverted second table creates the structural member between the first and third levels.
Place the third table right-side-up on top of the inverted second table and repeat the connection process. You now have a tower approximately 54 inches tall with three platform levels. Wrap all twelve legs with sisal rope using hot glue, starting at the base of each leg and working upward in tight, continuous wraps. Cut and staple carpet or fleece onto each platform surface. If desired, cut a circular hole in the lowest table’s side panel using a jigsaw to create an enclosed ground-level cave that transforms the bottom of the tower into a hiding space.
By cutting IKEA stools in half and mounting them to the wall, you achieve a very modern and cost-effective cat climbing solution. The couple that made this had zero woodworking experience, making this a great option for DIY beginners.
Why cats love this build: The IKEA hack produces platform heights at 18, 36, and 54 inches — the exact spacing that gives a cat a comfortable three-step route from floor to ceiling-adjacent height. The cave addition at the base gives shy or anxious cats an enclosed retreat within the tower itself, making it a dual-function piece.
Tower 4 — The Floor-to-Ceiling Tension Pole Tower (Intermediate, $60 to $90, One Day)
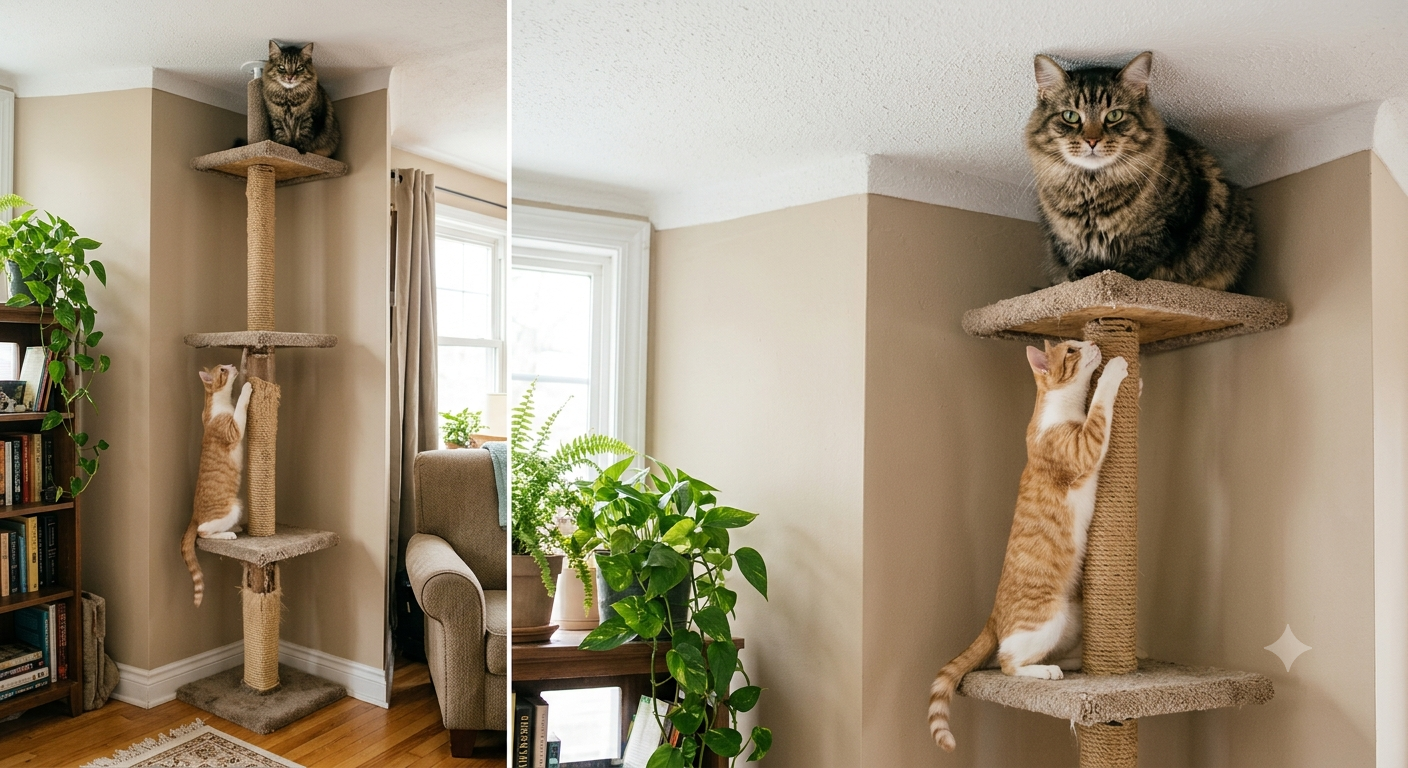
One wooden tension pole — floor-to-ceiling adjustable 67 to 114 inch range — and 4 to 5 solid wood platforms in 12×12 or 14×14 inch size. The tension pole’s adjustable spring mechanism locks it between the floor and the ceiling without a single hole in your wall. This is the build for renters, for people who refuse to put holes in their walls, and for anyone whose cat has maxed out the height of a freestanding tower and needs something that goes all the way to the ceiling.
Materials
One adjustable tension pole rated for at least 50 pounds — available from hardware stores and online. Four to five plywood platforms cut to 14×14 inches in three-quarter-inch thickness. Shelf mounting hardware compatible with your pole diameter. Sisal rope sections for wrapping the mid-section of the pole. Carpet or jute rope mat for platform surfaces. Wood screws. Sandpaper.
Build Steps
Start by sanding every platform edge until there are zero rough spots — cats drag their paws across these ledges constantly, and splinters are a disaster waiting to happen. Mount the tension pole in your chosen corner first. The corner location is deliberate — a pole against two walls has additional lateral stability from the wall surfaces and feels more enclosed and secure to cats than a free-standing pole in open space.
Lock the tension pole between the floor and the ceiling at maximum spring compression — push upward until the pole is tight against the ceiling before releasing the locking mechanism. Test stability by applying a significant lateral force at the midpoint of the pole. Zero movement is the standard to meet before attaching any platform.
Add jute rope mat scraps for platform padding. Start with a wood stain or a natural beeswax finish on the platforms. Attach platforms using purpose-made shelf brackets designed for tension poles — these clamp around the pole at the desired height and provide a platform mounting point. Space platforms are 12 and 18 inches apart. The top platform at ceiling height is the destination that makes this tower genuinely exciting for cats — the ability to rest at ceiling height, looking down at the entire room, satisfies the territorial surveying instinct at a level that no freestanding tower can match.
Why cats love this build: The ceiling height access is the defining feature. Cats who have been using the top of the refrigerator or kitchen cabinets as their preferred high perch will immediately recognize the ceiling-adjacent platform as superior and adopt it within days.
Tower 5 — The Boho White Faux Fur Tower (Intermediate, $50 to $80, One Day)
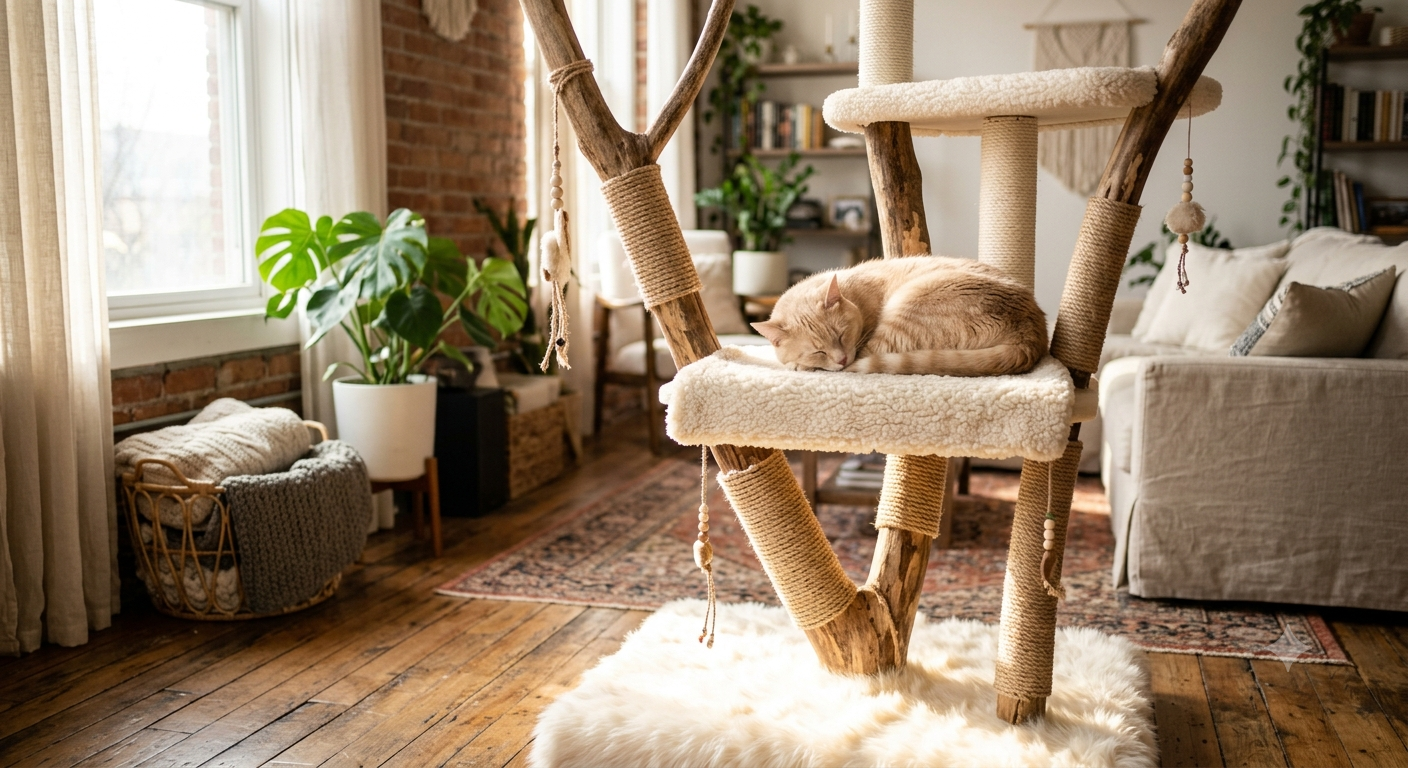
White faux fur fabric, natural bamboo or driftwood branches, jute rope, and a circular plywood base — it blends into a boho living room like it was always supposed to be there.
This is the tower for the cat parent who has been Pinterest-saving beautiful cat furniture for months and cannot find anything that matches the warm neutral aesthetic they have built in their home. This build produces exactly that — a soft, sculptural piece that photographs beautifully and integrates into a styled interior rather than sitting beside it.
Materials
One 24-inch diameter circular plywood base in three-quarter-inch thickness — cut with a jigsaw. Three driftwood branches or smooth bamboo poles of varying heights. White faux fur fabric — two yards. Jute rope for wrapping. Natural fleece or sherpa fabric for cushion surfaces. Wood screws and lag bolts. Non-toxic spray adhesive. Sandpaper.
Build Steps
Cut the circular base and sand all edges smooth. Seal the underside with exterior paint or sealant to prevent moisture absorption if the base will contact flooring. Drill three mounting holes in the base at the positions where your branches will stand, slightly inset from the edge to avoid splitting. Drive lag bolts up through the base into the bottom of each branch.
Wrap the lower sections of each branch with jute rope using hot glue — this creates the scratch zone while maintaining the natural wood aesthetic on the upper portions. Cover the base platform with white faux fur, pulling it taut from the center outward and stapling beneath the edge of the base. The faux fur should extend cleanly over the edge for a soft, finished appearance.
Add a small, rounded sleeping platform between two branches at approximately 24 inches in height, covered in Sherpa fabric. The platform can be as simple as a 12×12 inch plywood square with rounded corners secured between the branches with screws — the sherpa surface creates the specific plush texture that many cats prefer for sleeping over harder carpet surfaces.
Why cats love this build: The circular base gives cats the ability to approach the tower from any direction, which appeals to cats who prefer not to have their back to a wall while scratching or climbing. The varied branch heights create multiple scratching heights simultaneously.
Tower 6 — The Rolling Baltic Birch Modular Tower (Advanced, $80 to $120, Full Weekend)
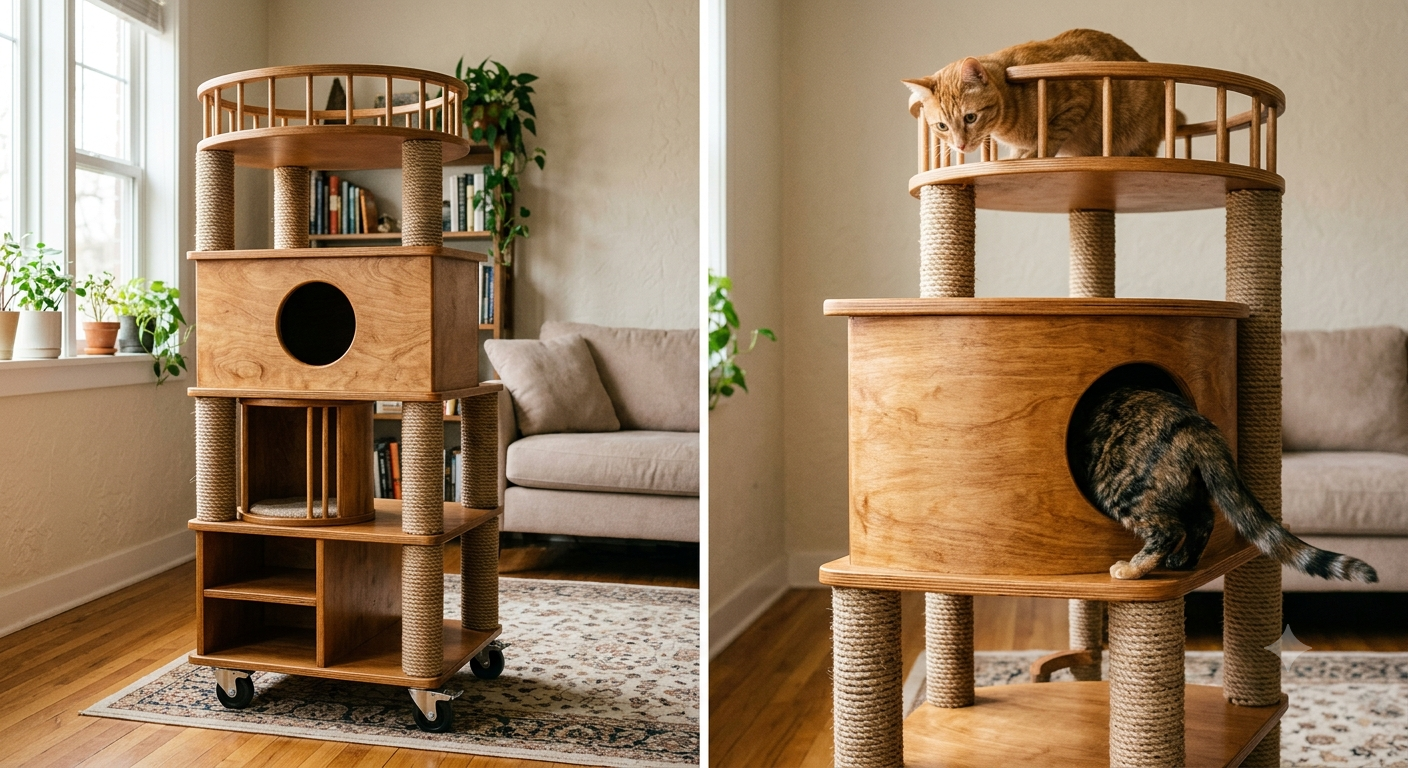
What you are building here is a multi-level modular cat tower mounted on a rolling base, made from Baltic birch plywood with wrapped sisal scratch posts. It sits against your wall like a piece of actual furniture — not like a pet store impulse buy.
This is the build for the woodworker in the group — the person who has a circular saw, knows what a jigsaw is for, and wants to build something genuinely furniture-grade that will last a decade and look better over time.
Materials
18mm Baltic birch plywood, natural unfinished. Four heavy-duty swivel caster wheels at least 2-inch diameter with a locking mechanism. Natural sisal rope 6mm thickness, approximately 50 meters. Wood screws 3.5cm and 5cm lengths. Wood glue waterproof formula. Sandpaper 120-grit and 220-grit. Circular saw or table saw. Drill and drill bits. Jigsaw for the round tunnel cutouts. Clamps at least 6. Non-toxic wood finish or matte clear coat. Hot glue gun for sisal finishing ends.
Build Steps
Cut all platform and panel pieces from Baltic birch using the circular saw, with the jigsaw reserved for the circular tunnel cutouts in the panel sections. Baltic birch has a fine, uniform grain that takes both sanding and finish extremely well. Sand each piece with 120 grit first, then 220 grit before applying the finish, and the resulting surface will feel and look like premium furniture. Apply non-toxic matte clear coat to all visible surfaces and allow full cure of 24 hours before assembly.
Build the base frame from 5cm screw and wood glue connections, clamping each joint for at least 30 minutes before adding the next. Attach the caster wheels at the four base corners using the provided hardware. The rolling base is this tower’s most practical feature — it allows repositioning for cleaning and enrichment rotation without lifting a heavy structure.
Build upward with enclosed box levels for hiding and open platform levels for perching, alternated for variety — an enclosed box at the bottom, an open platform at 24 inches, another enclosed box at 42 inches with a round jigsaw tunnel entry, and a final open perch at 60 inches. Wrap the corner vertical posts with sisal rope from the floor to the top of the first platform level. Apply finish details — small hanging rope toys, a sisal-covered ramp between the lowest platform and the floor for senior cat access.
Why cats love this build: The alternating open and enclosed levels address every behavioral preference simultaneously — the explorer, the hider, the percher, and the scratcher all find their ideal location. The mobility means you can rotate the tower position seasonally, which renews cat interest every time.
Tower 7 — The Repurposed Wooden Ladder Tower (Beginner, $15 to $30, Afternoon)
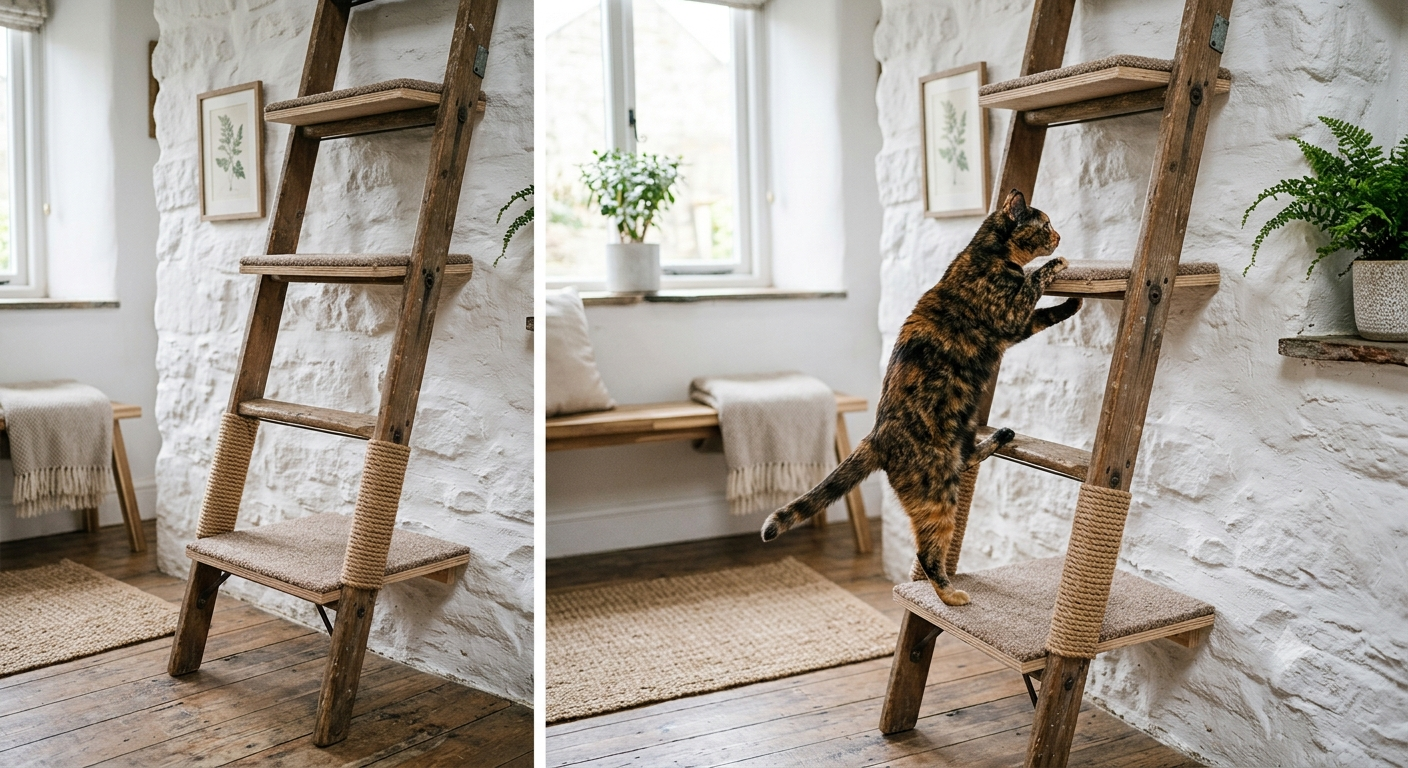
If you are using a wooden ladder, secure it in an open A-frame or lean it safely against a wall. Attach platforms made of plywood or spare wood at various heights. Wrap sisal rope tightly around vertical beams or branches. Use a staple gun to secure the rope at the top and bottom of each section.
A vintage wooden ladder from a thrift store, a hardware store, or your own garage becomes a cat tower in an afternoon with minimal tools and almost no cost. The ladder provides the structural frame — the rungs become the platform mounting points, the vertical rails become the scratch surfaces.
Materials
One wooden ladder in good structural condition — six to eight feet. Plywood pieces cut to fit between the rails at selected rung heights. Sisal rope for wrapping the rails. Carpet or fleece for platforms. Wood screws. Staple gun. Optional: additional brackets for wall securing at the top.
Build Steps
Inspect every rung and joint for structural integrity — reject any ladder with loose rungs, split wood, or any hardware that shows rust-through. Clean the ladder with a dry brush and sand any rough surfaces. Position the ladder leaning against a wall at approximately 75 degrees — steep enough that platforms will be relatively horizontal, not steep enough to feel unstable.
Attach plywood platform sections to the existing rungs by drilling pilot holes through the platforms and screwing them to the top face of each chosen rung. Three to four platforms at even intervals produce the ideal climbing sequence. Carpet each platform before attaching or use the carpet-then-attach sequence. Wrap the two vertical rails from floor level to the first platform with sisal rope using staples every ten wraps along the back of the rail and hot glue along the front-facing surface. Secure the top of the ladder to the wall using a hook-and-eye connection rated for the tower’s weight.
Why cats love this build: The A-frame or leaned configuration creates a visual and physical form that is remarkably similar to a leaning tree trunk — the kind of structure that wild felids use for scratching in their natural range. The angle of approach engages different muscle groups than a vertical post, providing genuine physical variety.
Tower 8 — The Giant Cable Spool Tower (Intermediate, $0 to $20, Afternoon)
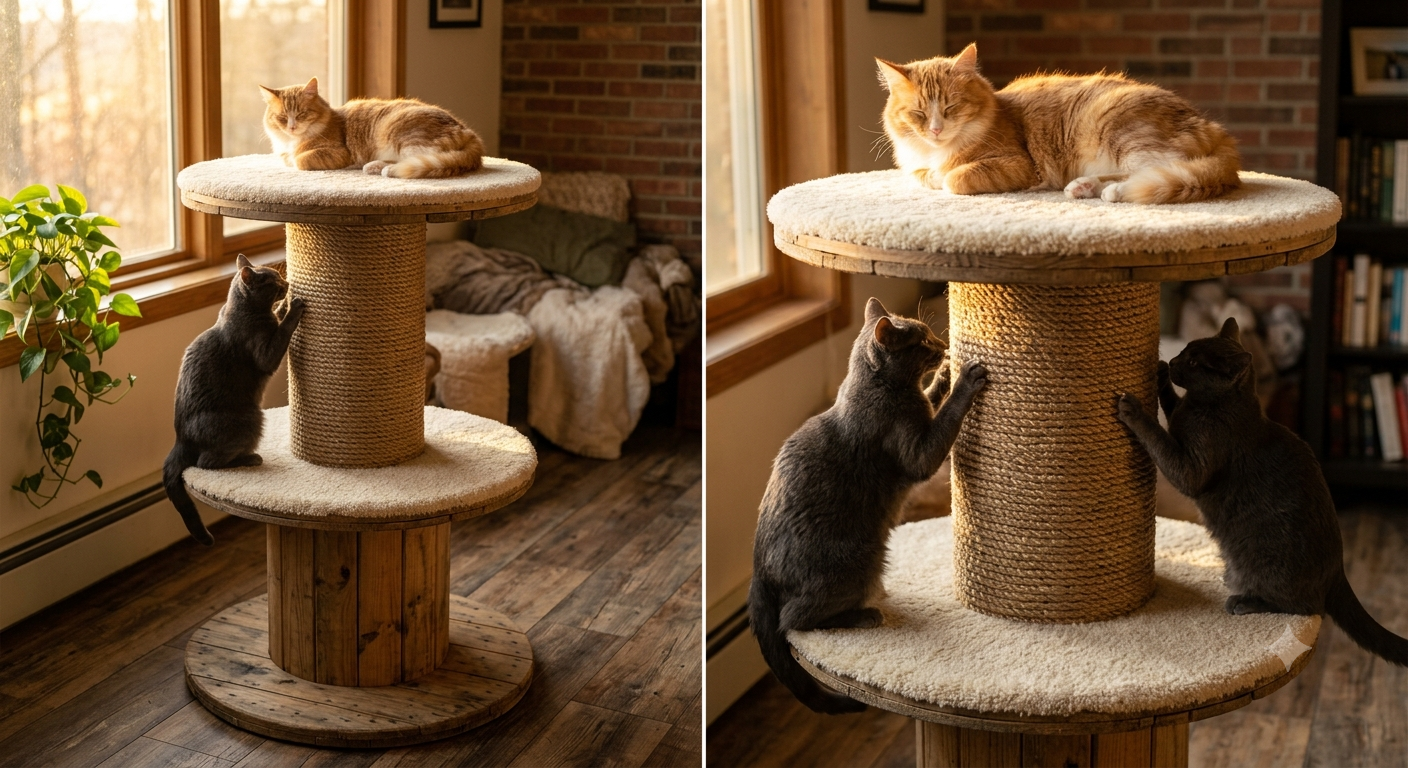
This DIY project repurposes a giant spool into a cat tree, house, and scratching post using scrap wood and sisal rope, creating a functional and stylish cat play area. Industrial cable spools — the giant wooden reels used for electrical and telecommunications cable — are given away free or sold for a few dollars by electrical supply companies, utilities, and construction sites. A large spool of 3 to 4 feet in diameter is an extraordinary cat tower base that costs almost nothing and produces a tower with floor area that most commercial towers cannot match.
Materials
One large wooden cable spool. Sisal rope for wrapping the central drum. Plywood for an elevated top platform if the spool top is not flat. Carpet or outdoor matting for surface coverage. Wood screws and lag bolts. Sandpaper. Non-toxic sealant.
Build Steps
Inspect the spool for structural integrity — check all flanges and the central drum for rot, splitting, and nail protrusion. Sand all surfaces thoroughly, as cable spools are rough-finished industrial items with significant potential for splinters. Seal the entire spool with non-toxic exterior wood sealant and allow full cure.
Wrap the central drum column with sisal rope from flange to flange using hot glue every five wraps and staples at each flange edge. The central drum is the primary scratch column and at 3 to 4 feet diameter it provides a scratching circumference that multiple cats can use simultaneously. Cover the bottom flange with outdoor carpet or matting as the ground-level platform. Add a smooth, carpeted top platform at the top flange level — either the existing flange surface carpeted directly or a plywood addition if the flange surface is uneven.
The central drum has enough volume to cut entry holes in both ends, creating an enclosed tunnel at the base of the tower. A jigsaw cuts the circles cleanly — sand the cut edge extremely smooth.
Why cats love this build: The sheer platform area of a large spool tower — a 4-foot diameter top surface — gives multiple cats space to share a perch without territorial conflict, which makes it the best multi-cat build in this list. The central drum’s large diameter provides a scratching column that cats can wrap themselves around completely while scratching — a particularly satisfying physical form.
Tower 9 — The PVC Pipe Modern Tower (Beginner, $25 to $45, Afternoon)
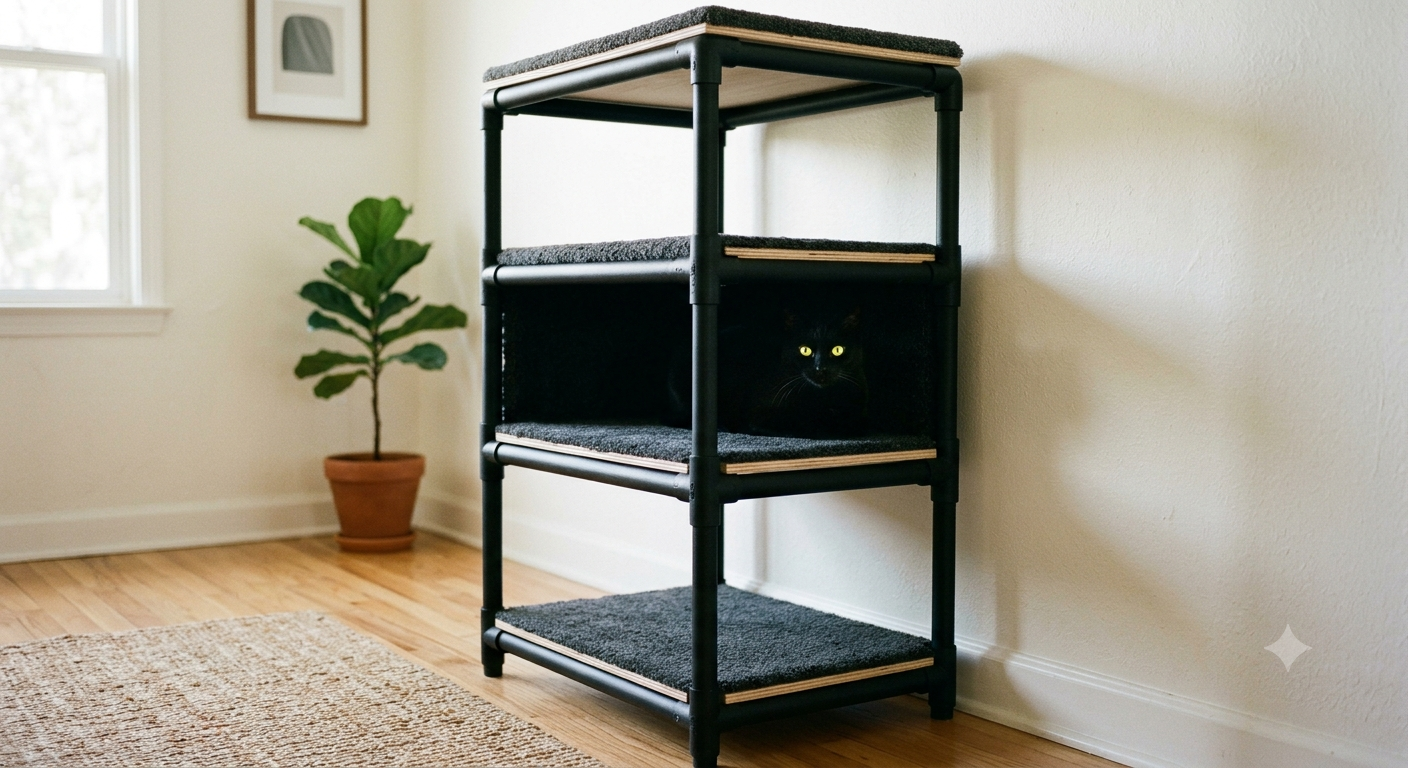
You can learn how to make a stylish and affordable cat tree using PVC pipes, plywood, and screws. By following the cutting, assembling, and painting steps, you can create a sleek and sturdy space for your cat. PVC pipe creates a clean, industrial-modern aesthetic that suits contemporary interiors better than carpet-covered towers and is one of the easiest structural materials to work with — no saw required, just a PVC cutter or handsaw.
Materials
PVC pipe in 2-inch or 3-inch diameter — the wider the pipe, the more structurally solid the tower. PVC T-junctions and elbow joints. Plywood platforms. PVC primer and cement for permanent connections. Sisal rope for wrapping if a scratch surface is desired. Spray paint in your chosen color. Carpet or fleece for platforms.
Build Steps
Design your structure on paper first — PVC pipe towers are easiest to build as grid structures, with vertical posts connected by horizontal crossmembers at each platform height. The T-junction fittings create the connection points between vertical posts and horizontal platform supports. Cut all pipe sections to length with a fine-tooth hacksaw or PVC pipe cutter.
Dry-fit all connections before applying any cement — arrange every piece in position and confirm all dimensions and alignments before making any connection permanent. Apply PVC primer to both the pipe end and the inside of each fitting, allow 30 seconds to become tacky, then apply PVC cement and twist the pieces together, holding for 30 seconds. PVC cement creates a chemical weld that is stronger than the pipe itself — these connections will never loosen.
Attach plywood platforms to the horizontal crossmembers using screws driven through the platform into the pipe. The PVC surface does not accept wood screws well on its own — drill pilot holes through the platform into the pipe and use longer screws with large washers for maximum contact area. Spray paint the assembled structure in any color before adding platforms and carpet for a fully finished look.
Why cats love this build: The clean lines of a PVC tower produce an unusual visual profile that cats investigate more persistently than familiar-looking structures. New visual experiences stimulate feline curiosity and accelerate adoption.
Tower 10 — The Cardboard Cylinder Condo Tower (Beginner, $25 to $40, Afternoon)
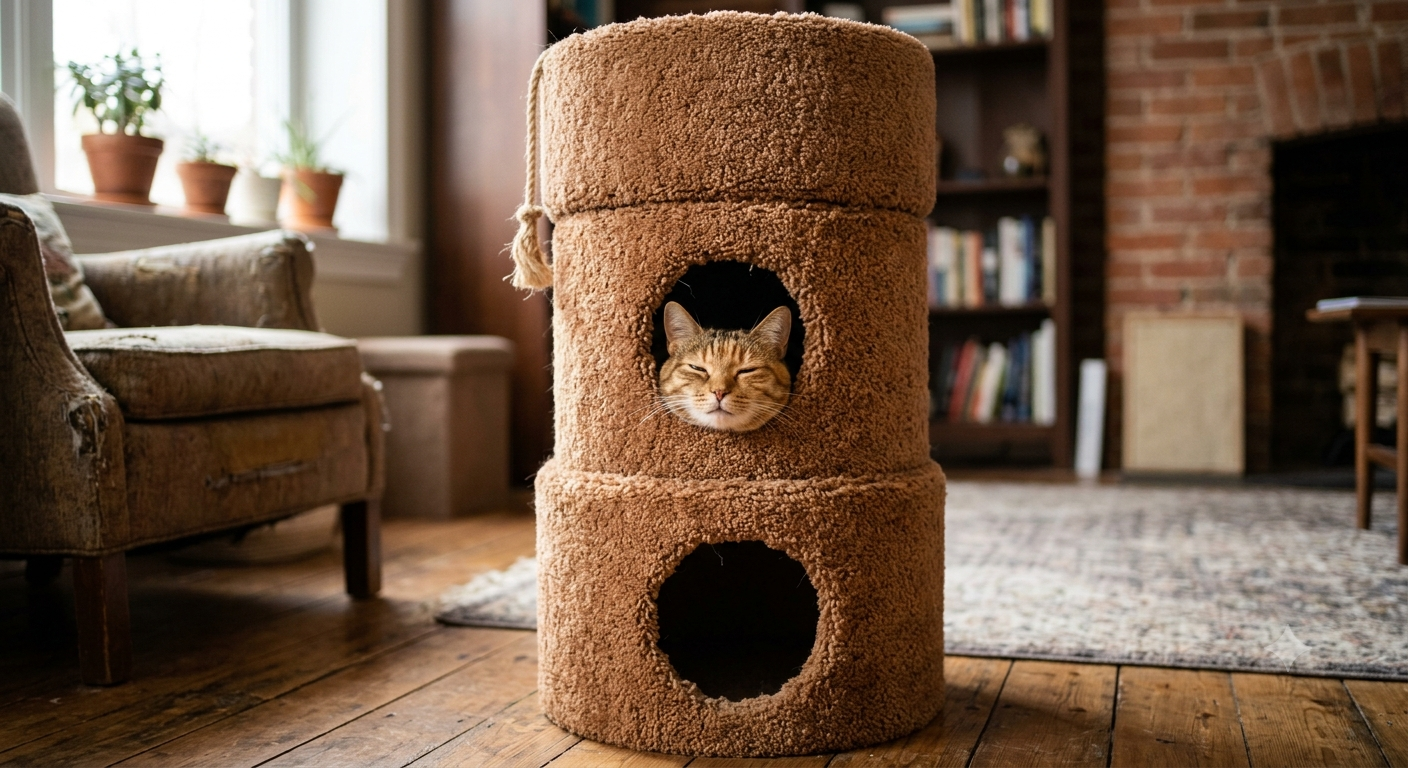
They used 4 cardboard cylinders bought for $8 each, cut holes, made ledges, and covered the whole thing in carpet. A very original idea. Cardboard concrete forms — the large cylindrical tubes used to pour concrete columns — are available from building supply stores at low cost and produce condo-style towers with enclosed cylindrical rooms that cats find irresistible.
Materials
Three to four concrete form cylinders of 12-inch diameter, cut to varying heights. Plywood circles for end caps and platform surfaces. Carpet remnant to cover exterior and interior surfaces. Jigsaw or utility knife for cutting entry holes. Carpet adhesive. Wood screws. A flat plywood base for the assembled structure.
Build Steps
Cut cylinders to your desired heights — a combination of 12-inch, 18-inch, and 24-inch sections creates visual variety. Cut a circular entry hole in the side of each section using a jigsaw — approximately 6 inches in diameter is the ideal cat-sized opening. Sand or fold the cut edge smooth.
Cut plywood circles to fit each cylinder end — these serve as both structural end caps and platform surfaces. Carpet each plywood circle on the top surface before attaching. Carpet the exterior of each cylinder — cut a rectangle of carpet to the cylinder circumference and height, apply carpet adhesive to the cylinder surface, roll the carpet around it tightly, and clamp or tape while curing. Arrange cylinders in a vertical stack or side-by-side cluster and connect them to a flat base plywood using screws through pre-drilled holes.
Why cats love this build: The cylindrical enclosed rooms are the most den-like of any tower design — the curved walls create a full enclosure that approximates the hollow tree trunks and rock cavities that wild cats use for secure resting. A cat asleep in one of these cylinders has a 360-degree physical boundary that produces the maximum sense of security.
Tower 11 — The Dark Walnut Floating Shelf Statement Tower (Advanced, $70 to $110, Full Weekend)
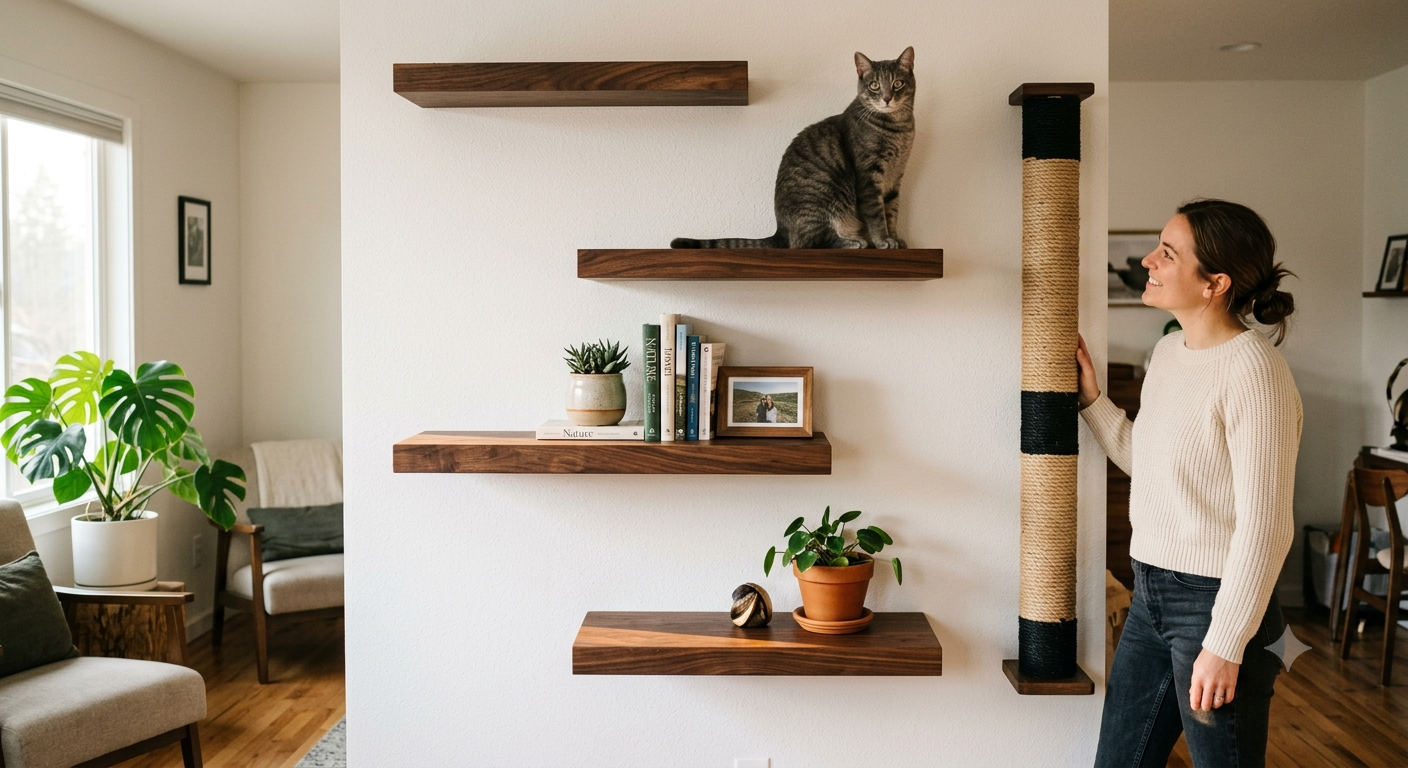
2×6 pine or oak boards for floating shelves, cut to 12×18 inches per shelf. A 4×4 wooden post, 6 feet tall, for the floor-to-ceiling scratching column. Natural sisal rope at least 200 feet for full wrapping coverage. Black jute rope for contrast banding. Dark walnut wood stain. Heavy-duty wall anchors rated for 50-plus pounds per shelf. L-brackets 4-inch steel hidden underneath each shelf.
This is the build that dominates the most aesthetically ambitious Pinterest cat furniture boards — the tower that combines a floor-to-ceiling scratch column with wall-mounted floating shelves in dark walnut stain, creating a piece that reads as interior design long before it reads as cat furniture.
Build Steps
Start by cutting your oak boards to size and sanding them down — hit them first with 120 grit then finish with 220 grit so the stain absorbs without blotching. Apply dark walnut stain in long, even strokes following the grain and wipe off excess after 5 minutes. Let dry overnight before applying a protective clear coat.
Mount the L-brackets beneath each shelf position, hidden from view by the shelf above. Find and mark every wall stud along the shelf installation area. Drive screws through the L-brackets into studs at every possible stud location. The dark walnut shelves floating on invisible brackets against a white wall create the gallery-style aesthetic that makes this build a genuine interior design piece.
Wrap the 4×4 post in sisal with a contrast band of black jute rope at the midpoint for visual detail. Mount the post to the wall beside the shelf system using lag bolts into studs at both top and bottom. The combination of the post and the floating shelves creates a complete climbing-to-perching system that a cat can use as a continuous route from floor to ceiling.
Why cats love this build: The dark walnut shelves positioned near the wall-mounted post create a connected system with variety — the post for scratching, the shelves for perching and surveying. The wall-mounted approach uses no floor space, which appeals to space-conscious owners and gives cats the wall-adjacent high perch that mirrors the tree-trunk-and-branch structure of their natural climbing preference.
Tower 12 — The Full Cat Kingdom Mega Build (Advanced, $100 to $180, Two Weekends)
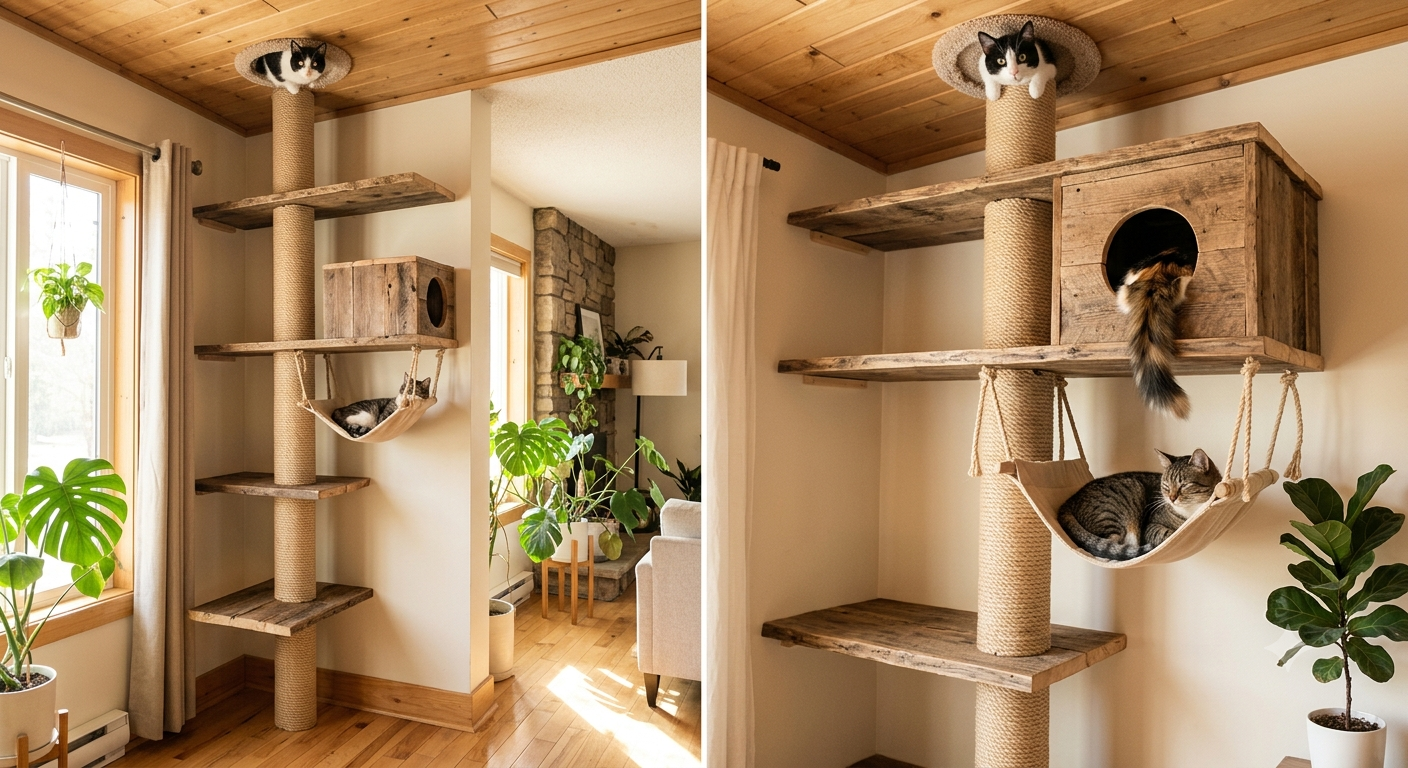
This is the build for the person who has finished every other project on this list and wants the definitive cat tower — the one that combines every feature into a single continuous structure that occupies a corner of the room and becomes the architectural feature of the space. Floating shelves connect to a central floor post, which connects to a ceiling-mounted tension pole, which connects to a hammock, which connects to an enclosed sleeping box — all in one continuous, richly detailed build that serves as a climbing route, scratch facility, sleeping quarters, and observation tower simultaneously.
Design Principle
The DIY cat lookout tower is a space-saving, customizable project that fits in room corners. It serves as a cat tree, scratching post, and playhouse. Build this tower into a corner so that two walls provide stability support. Design the route as a continuous loop — your cat should be able to start at the floor and reach every level without backtracking or jumping down. The loop design keeps active cats moving and prevents the territorial claiming of a single level that produces conflict in multi-cat households.
The Components
A 6-foot sisal-wrapped central post on a 24×24 plywood base. Three wall-mounted floating shelves in graduated heights connect to the post. A tension pole from the highest shelf to the ceiling, extending the route all the way up. A fabric hammock hung at a 36-inch height from the post using cup hooks and sturdy rope. An enclosed sleeping box at the 48-inch height — a plywood box with a circular entry hole, lined with fleece, mounted on a shelf bracket. A final open platform at ceiling height via the tension pole extension.
Attach a one-foot section of 2×2 perpendicular to the middle post for hammock support. Make a cat hammock with sailcloth, denim, or other sturdy fabric. Wrap with sisal rope. Hang a hammock.
The hammock is the component that makes this build irreplaceable. A fabric hammock suspended between the central post and a wall bracket creates a gently swinging resting surface at a height that most cats will occupy immediately and return to daily — the movement of the hammock satisfies the branch-sway instinct that evolved over millions of years of tree-sleeping, and no fixed platform replicates it.
Why cats love this build: Every behavioral need is addressed within one structure. The scratcher. The low approach shelf. The hammock. The enclosed sleeping box. The high open perch is at ceiling height. The route is continuous, varied, and never repetitive. A cat living with this tower has their entire behavioral enrichment requirement addressed without ever leaving the corner of one room.
The One Thing Every Build Has in Common
Twelve towers. Twelve different materials, twelve different skill levels, twelve different aesthetics, twelve different price points. And one thing every single one shares: the moment your cat steps onto something you built with your own hands for them specifically, and decides — in their characteristically non-dramatic, thoroughly confident, certain way — that it is theirs. That the corner of the living room, that patch of wall, that tension-pole perch at ceiling height, belongs to them now and has probably always been meant to be theirs.
That moment is worth every measurement, every length of sisal rope, every afternoon of drilling and carpeting and sanding edges until they are smooth enough for the paws that will walk across them for the next decade.
Build one this weekend. Your cat has been waiting long enough.