Schnauzer ears get infected. Not because Schnauzers are unusually fragile or unusually unlucky, but because their specific ear anatomy creates conditions that are reliably favorable to the organisms that cause ear infections. Understanding this anatomy changes how you approach ear care — from a routine chore you do when you remember to a genuine health maintenance practice that prevents costly, painful veterinary interventions. This guide covers everything: the anatomy that creates the problem, the signs of an infection at every stage, the exact step-by-step cleaning process, the products that work, the frequency that prevents without over-treating, and the moments when home care must stop and veterinary care must begin.
Why Schnauzer Ears Are Uniquely Vulnerable
Schnauzers can have either natural drop ears — which hang downward, covering the ear canal opening — or cropped ears that stand upright. Regardless of which type of Schnauzer your dog has, the ear canal itself shares the same structural characteristics: it is relatively narrow, it contains hair growth within and around the canal, and it has limited natural airflow through the enclosed space. These three factors combine to create the warm, moist, dark environment that bacteria and yeast find nearly ideal for colonization.
Infections inside the ear canal are a specialised form of skin disease complicated by severe yeast or bacterial overgrowth. They nearly always smell strongly, and if you put your nose right up to the canal, there is no mistaking the origin. The organisms responsible for most Schnauzer ear infections — Malassezia yeast and Pseudomonas, Staphylococcus, or other bacteria — are present in every healthy ear canal in trace amounts. They become problematic when the conditions within the ear shift toward the warm, moist, oxygen-poor extreme that allows them to multiply beyond the level the immune system can comfortably manage.
Hair growth inside and around the Schnauzer’s ear canal is a breed-specific feature that compounds the problem. The hair traps wax, debris, and moisture, reduces airflow, and creates additional surface area for organisms to colonize. This is why Schnauzer grooming should always include ear hair management — either by trimming the hair around the canal entrance or, in dogs with heavy internal ear hair, by discussing with your veterinarian whether plucking is appropriate for your individual dog.
Recognizing an Ear Problem Early — Before It Becomes Serious
The earlier you catch an ear problem, the faster and more completely it resolves. Early-stage ear infections are treated with topical medication alone and resolve in one to two weeks. Late-stage chronic ear infections require oral antibiotics, multiple vet visits, and sometimes months of management. Knowing the signs at each stage is the difference between those two outcomes.
Stage One — The Early Warning Signs
A mild yeasty or musty smell when you lift the ear flap. Your Schnauzer is shaking their head slightly more often than usual. Light brown or tan waxy discharge in the visible part of the canal that is slightly more than the pale, minimal wax of a healthy ear. No pain response when the ear is touched gently. This is the stage where your weekly cleaning catches the problem, and your vet can resolve it quickly.
Stage Two — Active Infection
A more pronounced smell — ranging from yeasty to distinctly foul. Head shaking that is frequent and forceful. Visible dark brown or yellow-green discharge. Your Schnauzer is pawing at the affected ear. Possible mild pain response when the base of the ear is touched. This stage requires veterinary examination — a swab and microscopic cytology examination identify exactly which organism is present and what medication will be effective.
Stage Three — Chronic or Severe Infection
Intense head shaking. Obvious pain when the ear is touched. Possible ear canal swelling that causes the canal to narrow. Possible spread of inflammation to the outer ear flap. Possible hearing reduction. This stage requires urgent veterinary attention — do not attempt to clean the ear aggressively at this stage, as a swollen, painful canal can be damaged by cleaning.
The Step-by-Step Ear Cleaning Process
This sequence works for both maintenance cleaning in healthy ears and early-intervention cleaning when mild buildup is detected.
Step 1 — Gather Your Supplies
A veterinary ear cleaning solution — not water, not hydrogen peroxide, not olive oil. Veterinary ear cleaners contain specific active ingredients, including drying agents, pH balancers, and mild antimicrobials that make them genuinely different from kitchen remedies. Ceruminolytics in professional cleaning solutions soften and break down wax buildup in a way that plain water cannot. Cotton balls or gauze squares for wiping. A towel. Your dog in a comfortable, calm position.
Step 2 — Initial Assessment
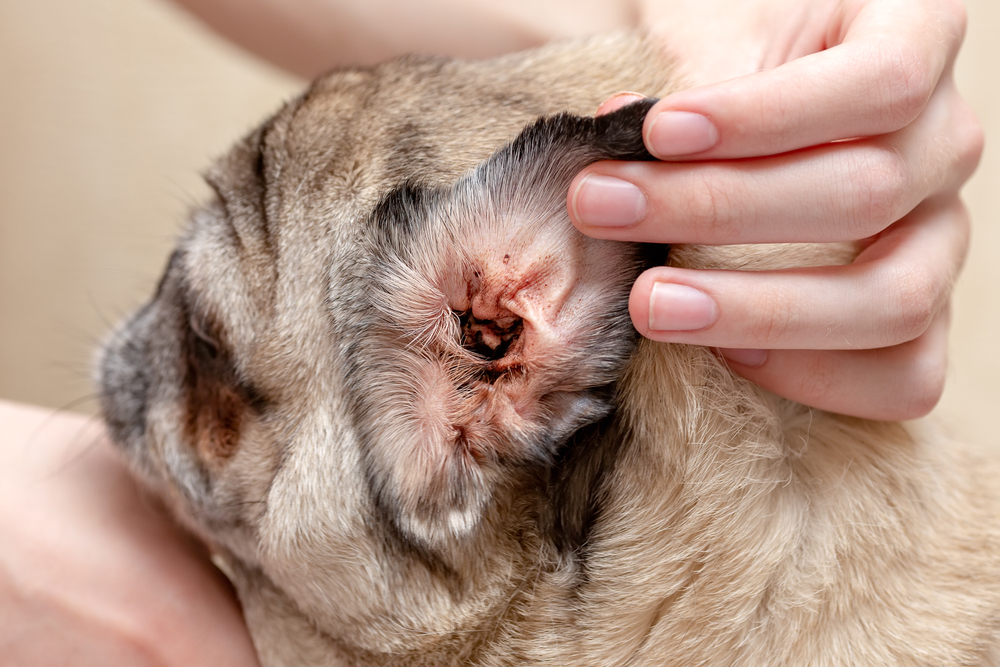
Before applying anything, lift the ear flap and examine the visible canal. Note the color, smell, and type of any discharge. A healthy ear interior is pale pink, lightly moist, and essentially odorless. Red or darkly discolored skin, strong smell, or significant discharge indicates a condition that needs veterinary attention before cleaning.
Step 3 — Apply the Cleaning Solution
Hold the ear flap upward to straighten the canal as much as possible. Insert the tip of the cleaning solution bottle into the canal opening — not deeply, just at the entrance — and squeeze enough solution to fill the canal. You will typically hear a slight squelching sound as the canal fills.
Step 4 — Massage the Base of the Ear
Fold the ear flap gently down and massage the base of the ear — the area at the bottom of the ear where it meets the skull — for 20 to 30 seconds. You should hear the solution moving and the wax and debris breaking up. This massaging step is the most important in the entire process, and the one most owners rush.
Step 5 — Allow the Head Shake
Stand back and allow your Schnauzer to shake their head vigorously. This is not a problem — it is the mechanism that moves the loosened material up and out of the canal toward the opening. The towel you prepared is for this moment.
Step 6 — Wipe the Visible Canal
Using a cotton ball or gauze square, wipe the visible portions of the canal and the inner ear flap, removing the debris that has come up. Never push the cotton further than the visible area of the canal. Do not use cotton swabs — the L-shaped anatomy of the dog ear canal means a swab inserted beyond the visible area pushes material further down rather than removing it.
Step 7 — Dry Thoroughly
Allow the ear to dry before replacing the ear flap. If needed, hold the ear flap up for a few minutes after cleaning to allow airflow through the canal. Some veterinary ear cleaners contain propylene glycol or isopropyl alcohol specifically to accelerate drying — these are appropriate for healthy-canal maintenance cleaning but should not be used in an inflamed or infected ear.
How Often to Clean — The Frequency That Prevents Without Over-Treating
Healthy ear with no history of infection: Every two to four weeks. This frequency maintains cleanliness without stripping the healthy wax that provides some protection to the canal surface.
Schnauzer with recurring ear infections: Every one to two weeks, more frequently if your veterinarian advises it. After every swim or bath, the moisture from water exposure is one of the most reliable infection triggers.
After swimming or bathing, always clean and dry immediately after any water exposure. This is the single most impactful habit change for dogs prone to ear infections — the infection that follows swimming is not coincidental; it is the predictable result of moisture entering an already-warm, already-favorable environment.
Over-cleaning is also a problem: Cleaning more than twice weekly strips the protective wax layer and can irritate the canal lining, paradoxically increasing infection susceptibility. The schedule above is the correct range for most Schnauzers.
The Products That Work — and the Ones to Avoid
Use: Veterinary ear cleaning solutions with ceruminolytic and drying agent ingredients. Products containing chlorhexidine, salicylic acid, or propylene glycol are appropriate for routine maintenance cleaning. Ask your vet for a specific product recommendation at your next visit.
Avoid: Water alone — it adds moisture without the cleaning agents needed to break down wax and without the drying agents needed to remove that moisture afterward. Hydrogen peroxide — it disrupts the ear canal’s healthy bacterial balance and can irritate. Olive oil, coconut oil, or other home remedies that add rather than remove moisture. Rubbing alcohol — it causes severe irritation to any inflamed tissue.
For active infections: Only use the specific medication prescribed by your veterinarian after cytology has identified the causative organism. Using the wrong antimicrobial for the wrong organism produces no result while delaying effective treatment.
When Home Cleaning Must Stop and Veterinary Care Must Begin
Stop home cleaning and contact your veterinarian if: the smell is strong and foul rather than mildly yeasty, the discharge is dark brown, green, or blood-tinged, your Schnauzer is showing obvious pain when the ear is touched, head shaking is frequent and forceful, the outer ear appears red or swollen, or any symptom has been present for more than five days of regular home cleaning without improvement. These signs indicate an active infection that requires professional diagnosis and prescription treatment. Home cleaning during an active, untreated infection can drive material further into the canal and can cause pain that makes all future ear handling more difficult.
Ear health is the single most commonly overlooked maintenance area in Schnauzer ownership and the one that produces the most veterinary visits and the most dog discomfort when neglected. Build the cleaning routine. Keep the schedule. Your Schnauzer’s ears will be healthier, their overall odor will be dramatically reduced, and the specific look of a Schnauzer who is not bothered by itchy ears — the relaxed, comfortable, unbothered expression — is its own sufficient reward.